Automatically start your SAP Business Application Studio instance with Puppeteer
Introduction
Every single morning I have a task that I need to do, sometimes this task takes a long time to run and othertimes it starts almost instantly. The task is starting SAP BAS (Business Application Studio) which if you've worked with it before is your own little containerised version of BAS which runs in a VM.
VM's therefore need to be started and depending on many factors unknown to me can sometimes be quick or they can be slow, so why not automate it?
Given my task on automation I decided to play around with Puppeteer which is a popular web automation tool that I've also not used before. Imagine the things you could potentially do in your day with web automation? The list is practically endless as not everything has an API such as starting BAS instances (that I could find anyway, if you know of an API for starting BAS I'd love to see that).
Note: You run this script at your own risk, while I saw nothing that said you can't do this in SAP's terms of service/ privacy statements any scripting on someone else's system should be considered a bit of a gray area.
Getting started
First you need to install and setup Puppeteer, this can sometimes be rather difficult and it depends on your system. I won't really cover setup too much in this post because it's been done to death by others but ultimately you need to do the following steps:
- Download and install node.js
- Create a folder for your script
- run "npm install puppeteer" in your terminal/ command prompt of choice
- create a javascript file, I named mine "example.js"
- copy and paste the example code from the github
- run the code in your terminal with node example.js
- Profit with the "example.png"
If the above works correctly (and trust me it might not) then we can move on to what this blog is actually for, otherwise you'll need to troubleshoot and get that working before following along. I am not an expert in this software, your setup, your org or anything else and so this can potentially be a difficult process or incredibly easy so I make no promises.
create our start-bas.js file
Create a new file in the same folder as your example.js file and call it "start-bas.js" and start with the basic which should look like the below:
const puppeteer = require('puppeteer');

(async () => {
  const browser = await puppeteer.launch();
  const page = await browser.newPage();
  await page.goto('https://TIALACCOUNTID.eu10cf.trial.applicationstudio.cloud.sap/index.html');
  await browser.close();
})();
replacing the argument with your BAS link, this can be trial accounts, production accounts doesn't matter.
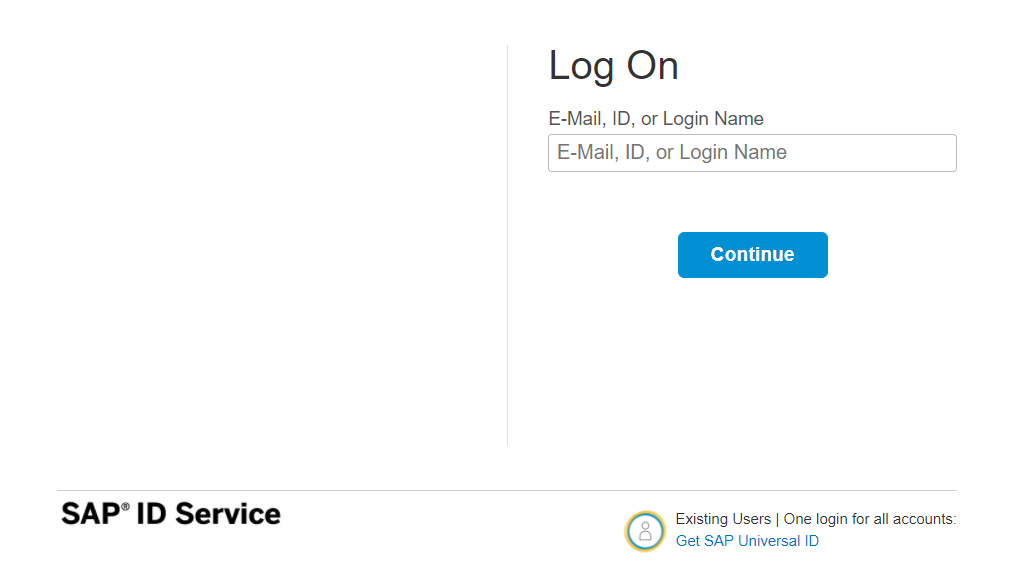
This if you run it would simply (in headerless mode so you won't see it) try and goto your BAS instance, but this will automatically re-direct us to the SAP logon page as we know looks like this:
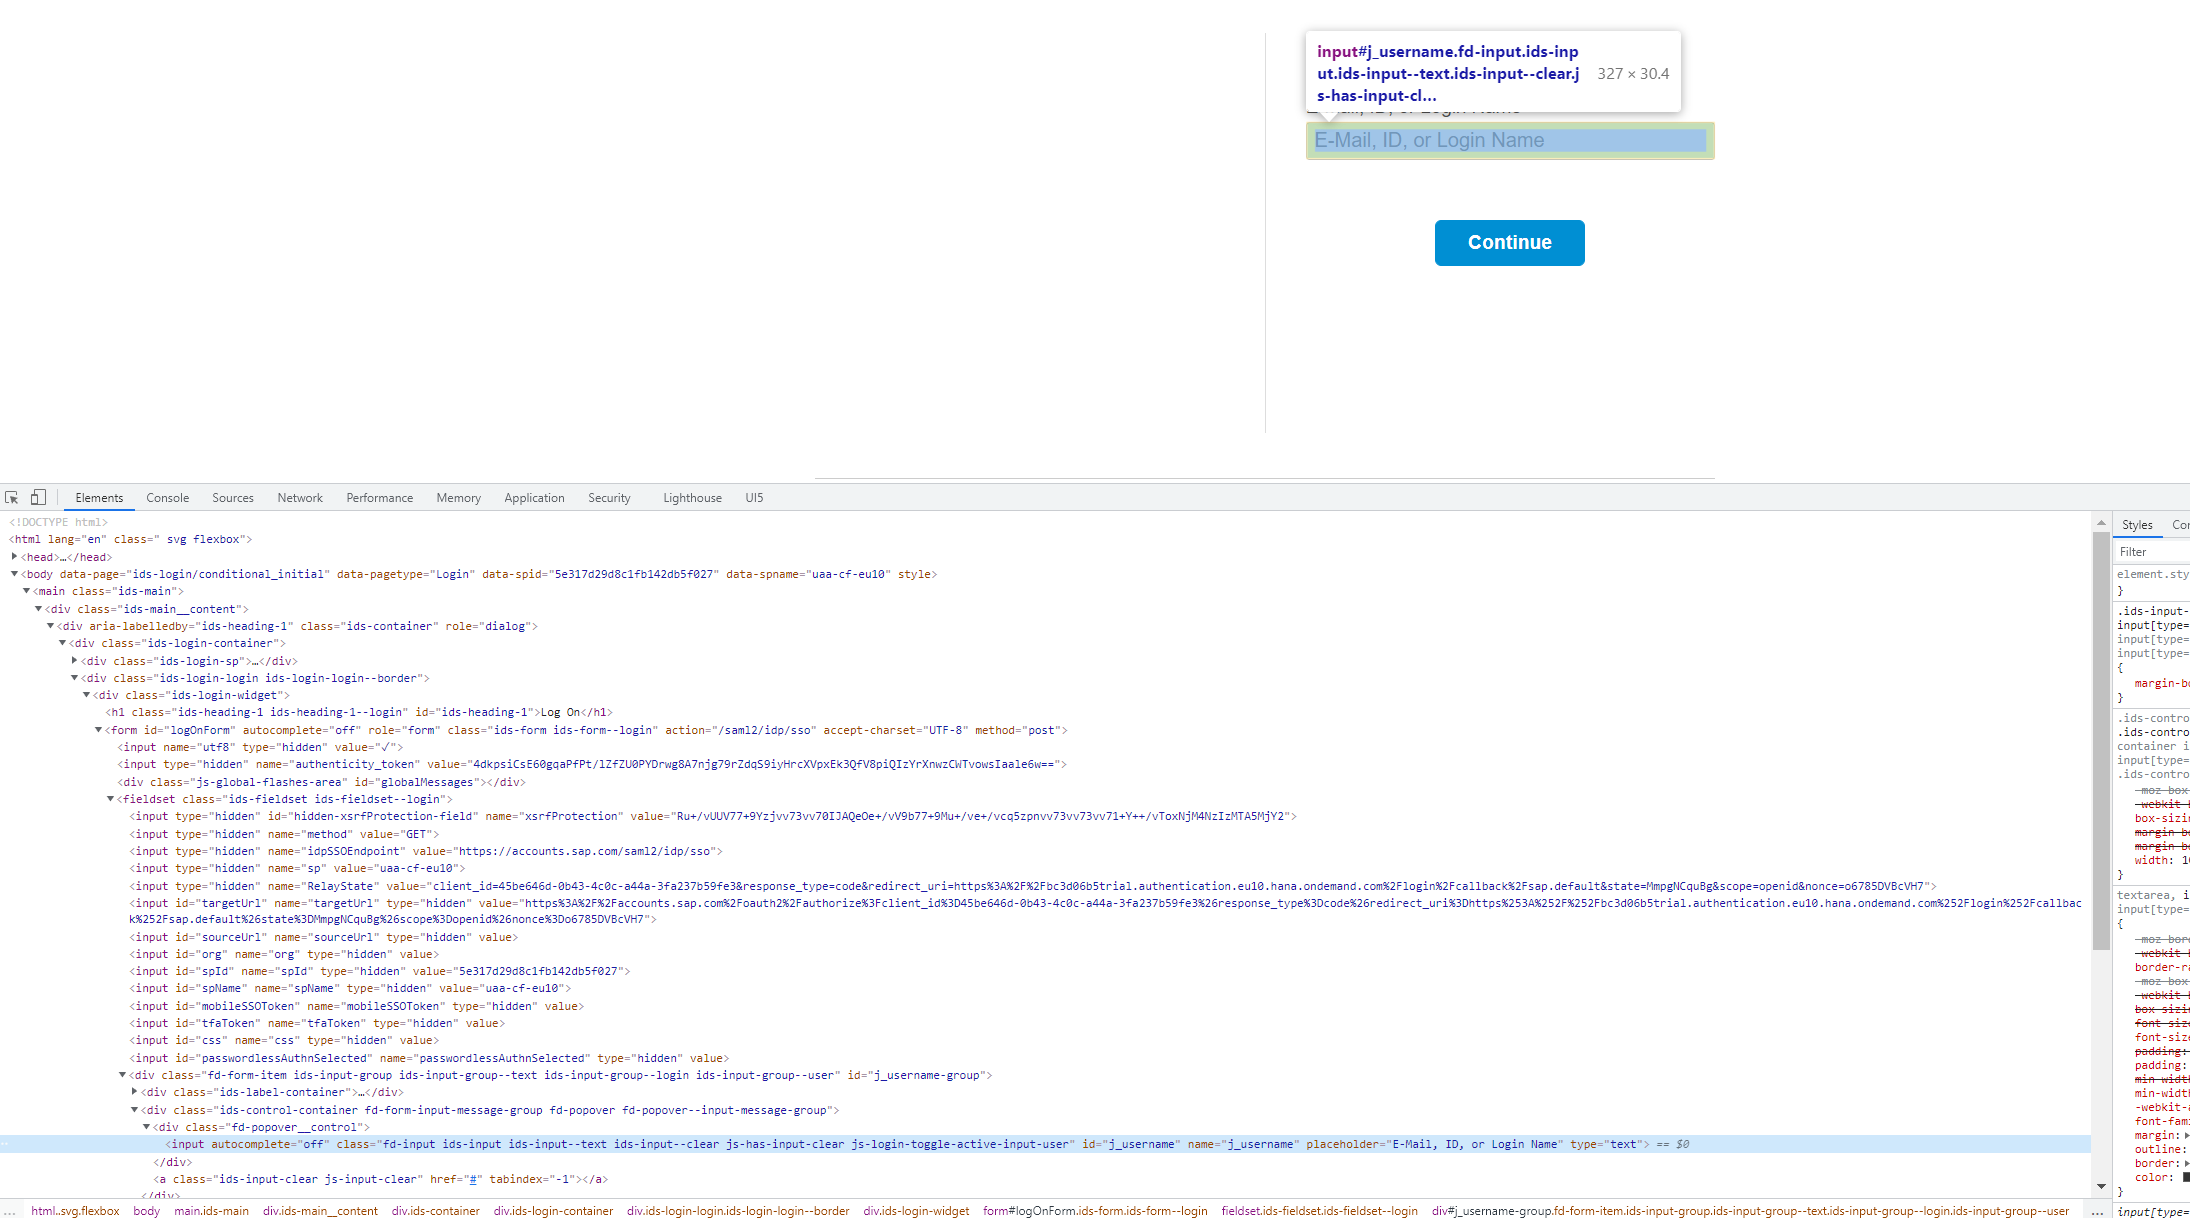
So we need to first of all select that "email" field and enter in our email address, which means we need to inspect the DOM and figure out the best query selector to grab the email input box.

As we can there's a very convenient ID called "j_username" which means in our javascript file we need to add the following lines:
await page.focus('#j_username');
await page.keyboard.type('nathan.hand@myemaildomain.com');
These two lines will focus on the username field and type in my username/ email address.
Next we need to click that "continue" button which repeating the same process nets us at the time of writing an ID of "logOnFormSubmit" which gives us our next line of code:
await page.click('#logOnFormSubmit');
Next up is repeating the above process but entering in our password but because we've clicked "continue" there might be a slight delay before the password field shows up and as such we need to wait for it.
The best way to wait for this is the operation called "waitForSelector" which gives us our next line of code as:
await page.waitForSelector('#j_password');
(Note: "j_password" is the ID we found for the password field)
Then repeat the steps of focus and type which gives us our next two lines of code:
await page.focus('#j_password');
await page.keyboard.type('mySecretPassword');
We now want to click the "log on" button which is incidentally the same ID as the previous "continue" button and so uses the same id and line of code
await page.click('#logOnFormSubmit');
ONLY NEEDED FOR TRIAL ACCOUNTS (as far as I can tell)
The next few lines only apply if you are using a trial account which is our next page with a popup asking us to accept the privacy statement for SAP BAS:
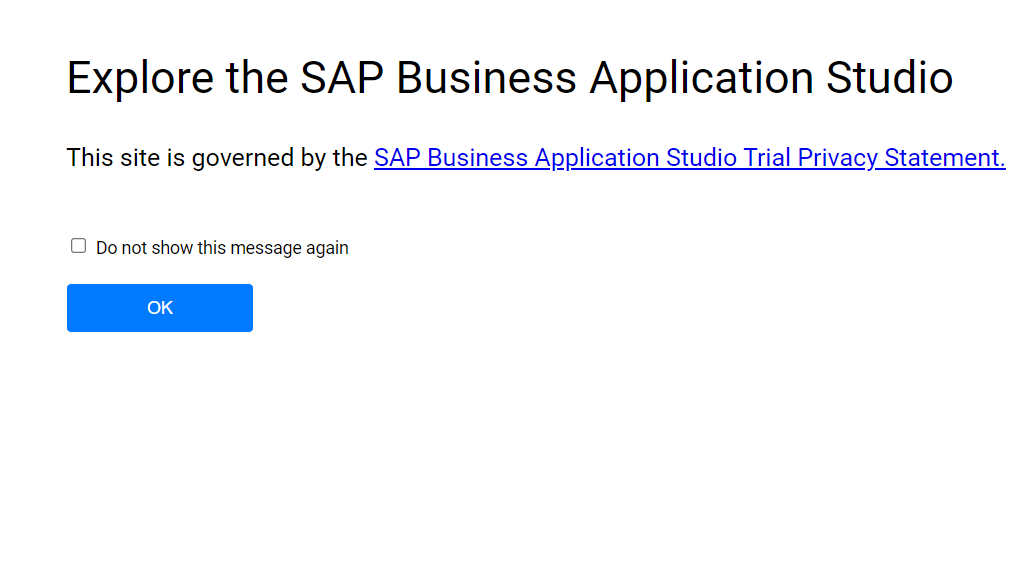
This should again be possible to just select the "ok" button but i've decided to skip that and instead wait for the page to load and then when it's loaded set the localstorage to not show that page again. This doesn't stay across runs of the script, but I wanted to show off a different way of getting passed some onscreen ui elements:
await page.waitForSelector('#notification');
  await page.evaluate(() => {
    localStorage.setItem("DoNotShowMessageAgain", "true");
  });
The BAS instances page
Now, the BAS instances page you would think is exactly the same easy click this button and that button as all the others. However, it seems that the actual list of BAS instances that you have is loaded from inside of an iframe and so we need to change our stratgey a little bit. Here is the DOM showing the iframe:
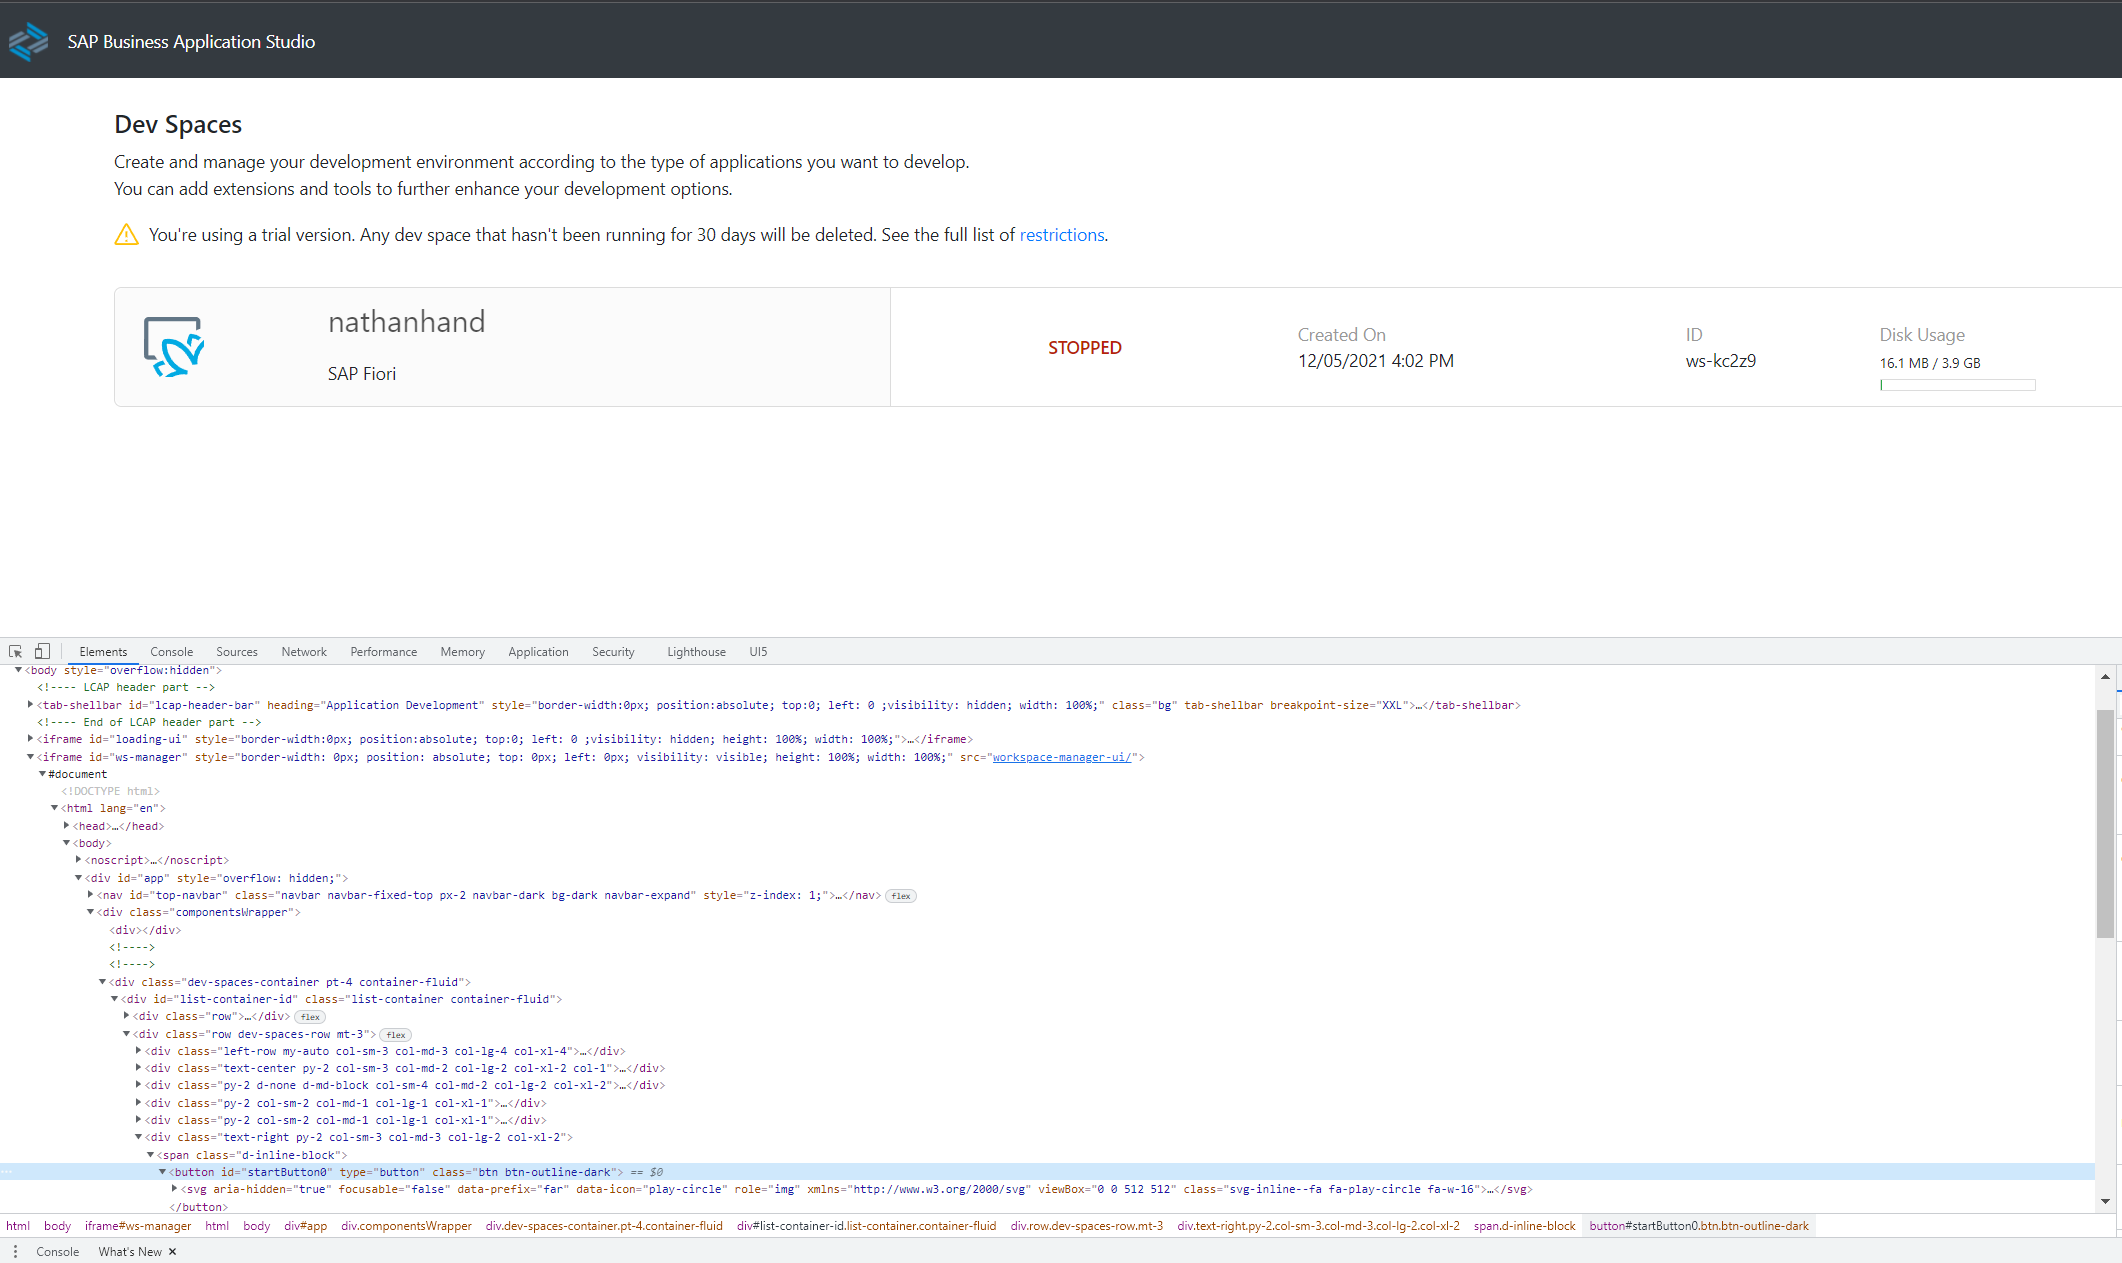
But first the same as before we have to wait for that iframe to load in which has the ID of "ws-manager" and so we wait with the following line:
const workSpaceIframe = await page.waitForSelector('#ws-manager');
So to get access to the internals of the iframe we have to add the following variables/ lines:
const workSpaceIframeContext = await workSpaceIframe.contentFrame();
Then we can wait on the first start button to show up with the following line:
await workSpaceIframeContext.waitForSelector('#startButton0');
NOTE: You might have more than one BAS instance in your production system, so you might need to change the ID or even just change up how we search for the correct button.
Lastly we need to click that button which we're mostly familiar with but the slight different is we're acting upon the iframe:
await workSpaceIframeContext.click('#startButton0');
Lastly we close the browser, however clicking the "start" button doesn't just automatically trigger our start it actually sends off an API request to the backend and if we close our browser too early it doesn't seem to trigger.
To handle this we get to use yet another waiting function which is "waitForResponse" which basically just means that we're going to wait for the request to finish before taking action, you'll get to get the PUT url like I did but it should look something like this:
await page.waitForResponse("https://trialaccountid.eu10cf.trial.applicationstudio.cloud.sap/ws-manager/api/v1/workspace/ws-workspaceid");
Lastly we need to fire our browser close which looks like this:
await browser.close();
TL;DR what's the script:
const puppeteer = require('puppeteer');

(async () => {
  const browser = await puppeteer.launch({headerless : false});
  const page = await browser.newPage();
  await page.goto('https://bc3d06b5trial.eu10cf.trial.applicationstudio.cloud.sap/index.html'); //CHANGE ME
  await page.focus('#j_username');
  await page.keyboard.type('nathan.hand@myemaildomain.com'); //CHANGE ME
  await page.click('#logOnFormSubmit');
  await page.waitForSelector('#j_password');
  await page.focus('#j_password');
  await page.keyboard.type('mySecretPassword'); //CHANGE ME
  await page.click('#logOnFormSubmit');
    //START TRIAL ACCOUNT ONLY SECTION
  await page.waitForSelector('#notification');
  await page.evaluate(() => {
    localStorage.setItem("DoNotShowMessageAgain", "true");
  });
    //END TRIAL ACCOUNT ONLY SECTION
  const workSpaceIframe = await page.waitForSelector('#ws-manager');
  const workSpaceIframeContext = await workSpaceIframe.contentFrame();
  await workSpaceIframeContext.waitForSelector('#startButton0');
  await workSpaceIframeContext.click('#startButton0');
  await page.waitForResponse("https://bc3d06b5trial.eu10cf.trial.applicationstudio.cloud.sap/ws-manager/api/v1/workspace/ws-kc2z9"); //CHANGE ME
  await browser.close();
})();
Conclusion
That's it! this was a very quick dive into Puppeteer and how to go through the steps of automating a process that you wouldn't otherwise be able to do automatically. I didn't go into scheduling this script, but you can run Puppeteer automations on some pretty low end hardware such as a Raspberry PI.
Did you like this sort of content? It was a bit different to my usual UI5 blogs, mostly it was just a personal itch of mine that I wanted to scratch and I thought others might have the same problem/ want to get an idea for web automation. Let me know in the comments down below!
···
