Creating a cryptocurrency application using UI5 and chart.js
In this post I'll cover the use of the Coinmarketcap API, implementing and understanding routing inside of UI5 and then finally importing the chart.js library into our application so that we can show some pretty rudamentery predictions / projections on the price given current trends.
NOTE: This application should definitely not be used to help make decisions in purchasing any cryptocurrencies.
Demo
Getting Started
So getting started I’m going to use a blank application, once again I’m using ExpressUI5 (disclaimer I made this). You should be able to follow along using the standard template from UI5 but I'll also include a link to a github repo of all the code shown here at the end.
coinapi.js
Exactly the same as my previous blog post I’m going to make a utility file which will house all of my calls to the API which will provide me my data for this application. The API that I’ve decided to use to get this information is the freely available API from coinmarketcap and I suggest before going too much further that you have a quick glance at their API documentation.
This file is relatively simple and looks like the following:
sap.ui.define([], function () {
    "use strict";
    return {
        getCurrentPrice: function(currencyCode)
        {
            currencyCode = currencyCode ? currencyCode : "GBP"
            const url = `https://api.coinmarketcap.com/v2/ticker/?convert=${currencyCode}`;
            const req = new Request(url);
            return fetch(req).then(response => response.json()).then(json => json.data);
        },

        getSingleCoinPrices: function(coinId, currencyCode)
        {
            coinId = coinId ? coinId : "1";
            currencyCode = currencyCode ? currencyCode : "GBP";
            const url = `https://api.coinmarketcap.com/v2/ticker/${coinId}/?convert=${currencyCode}`;
            const req = new Request(url);
            return fetch(req).then(response => response.json()).then(json => json.data);
        }
    };
});
Our initial view and controller
Our first view will be a simple one, I won’t waste too much time with this initial view and controller but I want to make sure that I understand how the API works and how to make the calls and what data I have to play with.
As such our controller is relatively simple and as follows:
sap.ui.define([
    "nathan/hand/coins/controller/baseController",
    "nathan/hand/coins/util/coinapi",
    "sap/ui/model/json/JSONModel"
], function(baseController, coinapi, JSONModel) {
    "use strict";

    return baseController.extend("nathan.hand.coins.controller.mainView", {

        onInit: function() {
            coinapi.getCurrentPrice().then(coins => this.setCoinModel(coins));
        },

    setCoinModel: function(coins){
            var coinsJson = new JSONModel(coins);
            this.getView().setModel(coinsJson, "coins");
    }
    });
});
The view is just as simple, I did vote to pass a parameter to the API call already which was to give me the currency prices in “GBP” as I’m from the UK and that’s the most relevant to me. Feel free to change this in your application, though please note that your binding in the view will differ slightly using your own currency code.
<mvc:View controllerName="nathan.hand.coins.controller.mainView" xmlns:html="http://www.w3.org/1999/xhtml" xmlns:mvc="sap.ui.core.mvc"
displayBlock="true" xmlns="sap.m">
<App>
<pages>
<Page title="{i18n>title}">
<content>
<Table
inset="false"
items="{path: 'coins>/'}">
<columns>
<Column>
<Text text="Name" />
</Column>
<Column>
<Text text="Price" />
</Column>
<Column>
<Text text="% change in 24H" />
</Column>
</columns>
<items>
<ColumnListItem>
<cells>
<Text text="{coins>name}" />
<Text text="£{coins>quotes/GBP/price}" />
<Text text="{coins>quotes/GBP/percent_change_24h}%" />
</cells>
</ColumnListItem>
</items>
</Table>
</content>
</Page>
</pages>
</App>
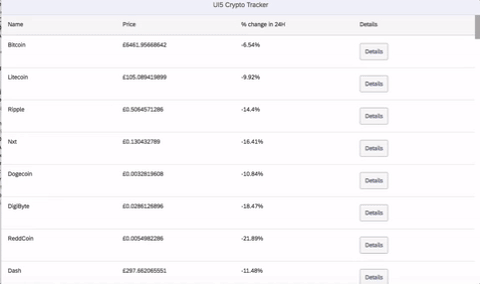
</mvc:View>The above should result in a page that looks like the following:

The above isn’t going to win any design contests but we’ve successfully managed to call the Coinmarketcap API and return a list of current prices which is pretty good work for only a few lines of code! Next we’ll move onto making our new route inside of our manifest.json (along with the new files that accompany that) and make a few minor changes to our view.
Routing
One of the things that I initially struggled with in UI5 was routing, adding routing to an application from scratch is something that I think all UI5 developers should do if only to understand how it all works.
Having said this there is an excellent guide/ help section available from SAP on this subject which is much more in depth than what I'm about to write which you can view over here.
Routing in our application is stored in the manifest (for versions greater than 1.28), this is where you can define all of the routes for our application and which target (view) they goto.
First we'll need to create our new "rootView" view and controller this is something you might be familiar with from other UI5 projects as most SAP templates/ applications have these files. These are essentially completely blank for our purposes and are instantiated every time we load our application.
app.view.xml (new file)
<mvc:View
    xmlns:mvc="sap.ui.core.mvc"
    controllerName="nathan.hand.coins.controller.app"
    displayBlock="true"
    xmlns="sap.m">
    <App id="app"/>
</mvc:View>
app.controller.js (new file)
sap.ui.define([
    "nathan/hand/coins/controller/baseController"
    ], function (BaseController) {
        "use strict";

        return BaseController.extend("nathan.hand.coins.controller.app", {
            onInit : function () {
            //We might usually do something in here such as set the screen to busy while we wait for our metadata etc.
            }
        });
    }
);
Next we'll need to create our new view and controller for our next view, this can be achieved by simply copying your existing files (mainView.controller.js & mainView.view.xml) and replacing the relevant names.
Next we need to open up and edit our manifest.json which is found at the root of our webapp folder. First we'll need to edit our "rootView" to be the same as our newly created "app.view.xml" which will look like this:
    "rootView": {
            "viewName": "nathan.hand.coins.view.app",
            "type": "XML"
        },
Next we need to add a new section under “sap.ui5” called “routing” which looks like the following :
        "routing": {
            "config": {
                "routerClass": "sap.m.routing.Router",
                "viewType": "XML",
                "viewPath": "nathan.hand.coins.view",
                "controlId": "app",
                "controlAggregation": "pages",
                "bypassed": {
                    "target": "notFound"
                }
            },
            "routes": [{
                "pattern": "",
                "name": "main",
                "target": "main"
            }, {
                "pattern": "detail/{coinId}",
                "name": "coinDetails",
                "target": "coinDetails"
            }],
            "targets": {
                "main": {
                    "viewName": "mainView",
                    "viewId": "mainView",
                    "viewLevel": 1
                },
                "coinDetails": {
                    "viewName": "coinDetails",
                    "viewId": "coinDetails",
                    "viewLevel": 2,
                    "transition": "flip"
                }
            }
        },
Understanding the routing
Under the “routing” section we have a bunch of standard config inside of the “config” section, you will note that you’ll have to change the namespace for viewPath here to your own namespace and everything else can be left the same in this section.
Patterns, names and targets
The pattern - What will be displayed in the URL, this can have parameters like we have in our “coinDetails” section but just understand that this should be unique and parameters are defined by enclosing them in brackets as seen above. So later the URL will change to something like "http://ui5coins.devv/webapp/#/detail/1" and I can grab the parameter "1" and use that in my next page.
The name - All names must also be unique, this is used in our controller when we do navigation. This doesn’t have to be the same as our view name but generally it will be for ease of use and will likely only change when we have multiple entrances into the same view (target) and we need to identify them differently.
The target - The target simply references the “targets” section, this is done this way because we might want to have multiple patterns that go into the same view.
Targets are relatively self explanatory, make sure that your viewName matches the names of your files and the name of the targets object matches the target name you gave above.
Initialize the router in component.js
Inside of our UI5 application we just need to add the router initialization to our component.js so that it looks something like this:
sap.ui.define([
    "sap/ui/core/UIComponent",
    "sap/ui/Device",
    "nathan/hand/coins/model/models"
], function(UIComponent, Device, models) {
    "use strict";

    return UIComponent.extend("nathan.hand.coins.Component", {

        metadata: {
            manifest: "json"
        },

        /**
         * The component is initialized by UI5 automatically during the startup of the app and calls the init method once.
         * @public
         * @override
         */
        init: function() {
            // call the base component's init function
            UIComponent.prototype.init.apply(this, arguments);

            // set the device model
            this.setModel(models.createDeviceModel(), "device");

            //Initialise the router
            this.getRouter().initialize();
        }
    });
});
Testing our navigation
Next we need to test that our navigation is working, to do this we need to add either a button or maybe use a different control which has an onPress event built in for this sort of functionality. For this example I'm just going to add a small button to the table, I think we can skip that code snippet and instead have a look at our press event:
navToDetails: function (oEvent) {
let object = oEvent.getSource().getBindingContext("coins").getObject();
let coinId = object.id;
    this.getRouter().navTo("coinDetails", {
        "coinId" : coinId
    });
},
The above code simply grabs the current object and we grab the coinId which in the case of Bitcoin is "1" which is the ID assigned by Coinmarketcap. If you're unsure why we need this I suggest looking at the API documentation.
Then once inside of our new controller we can access the coinId as shown here:
sap.ui.define([
    "nathan/hand/coins/controller/baseController",
    "nathan/hand/coins/util/coinapi",
    "sap/ui/model/json/JSONModel"
], function(baseController, coinapi, JSONModel) {
    "use strict";

    return baseController.extend("nathan.hand.coins.controller.coinDetails", {

        onInit: function() {
            this.getRouter().getRoute("coinDetails").attachMatched(this._onRouteMatched, this);
        },

        _onRouteMatched: function(oEvent){
            let coinId = oEvent.getParameter("arguments").coinId;
            console.log(coinId); //1 if we selected the "Bitcoin" row.
        }
    });
});
Success! We've managed to add in routing to our application and navigate to our new page. Now that we have the correct ID inside of our new view we can make some calls to the API and get some further data to display to the user.
Adding in Chart.js to our application
Now that we've got a page to look at our selected coin in more detail we should add in some graphs. UI5 does come with graphs out of the box called Vizframe but generally I've found open source solutions such as Chart.js to provide a better experience that's easier to use.
To add in Chart.js we're going to make use of an OpenUI5 wrapper created by @StErMi. We simply need to download the library-preload.js from the github repo found here.
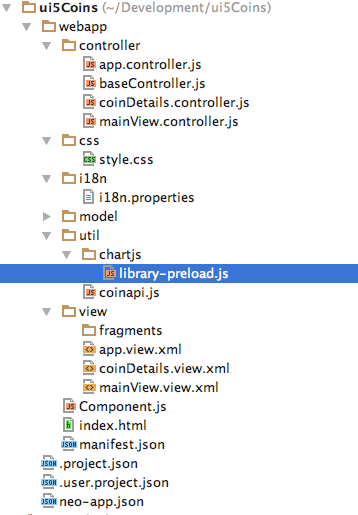
Downloading this file we're going to place it inside of a new folder under webapp/util/chartjs so you should have a structure that looks like this:
Now going back to our manifest.json we need to add two things a new library dependancy and a new resourceroot. Adding the new resource root should be entered at the bottom of our "sap.ui5" section and look like this:
"resourceRoots" : {
     "it.designfuture.chartjs" : "./util/chartjs"
}
Note the use of the namespace "it.designfuture.chartjs" and when we add in our dependancy it'll look like the following (some of your dependancies may vary to mine, the important part is the new addition):
"dependencies": {
    "minUI5Version": "1.30.0",
    "libs": {
        "sap.ui.core": {},
        "sap.m": {},
        "sap.ui.layout": {},
        "sap.ushell": {},
        "sap.collaboration": {},
        "sap.ui.comp": {},
        "sap.uxap": {},
     "it.designfuture.chartjs": {}
   }
},
lastly we need to include the library in each XML view that we want to use at the top of the view with the following additional line
xmlns:lab="it.designfuture.chartjs"Given that we can then call our new chart in an example like the following:
<lab:BarChartJS
    id="barChart"
  datasets="{dataModel>/datasets}"
  labels="{dataModel>/labels}"
  titleDisplay="true"
  titleText="My usage chart"
  onLegendItemClick="onLegendItemClick"
  onLegendItemHover="onLegendItemHover"
  onClick="onClick"
  maintainAspectRatio="false"
  onHover="onHover"
  tooltipEnabled="true"
  onAnimationProgress="onAnimationProgress"
  onAnimationComplete="onAnimationComplete"
  isHorizontal="false">
</lab:BarChartJS>
Details view and controller update
Now we have all the tools to make a nice little detailed coin view where we can display some more detailed stats on the current performance of the coin and make our projection graph.
The view is rather simple, I wanted to display current currency conversions for my coin and then some other information such as coins in circulation, total count etc. (note that not all coins have a total cap)
That view came out like this:
<mvc:View controllerName="nathan.hand.coins.controller.coinDetails" xmlns:l="sap.ui.layout" xmlns:html="http://www.w3.org/1999/xhtml" xmlns:mvc="sap.ui.core.mvc"
displayBlock="true" xmlns:lab="it.designfuture.chartjs" xmlns="sap.m">
<Page title="{i18n>title} - {coin>/name}({coin>/symbol})" showNavButton="true" navButtonPress="onNavBack">
<content>
<l:Grid class="sapUiSmallMarginTop" defaultSpan="L4 M6 S12">
<HBox>
<Image src="https://s2.coinmarketcap.com/static/img/coins/32x32/{coin>/id}.png"/>
<Title level="H1" text="{coin>/name} ({coin>/symbol})" />
</HBox>
<VBox>
<Text text="{coin>/quotes/USD/price} USD ({coin>/quotes/USD/percent_change_24h}%)"/>
<Text text="{coin>/quotes/GBP/price} GBP ({coin>/quotes/GBP/percent_change_24h}%)"/>
<Text text="{coin>/quotes/EUR/price} EUR ({coin>/quotes/EUR/percent_change_24h}%)"/>
</VBox>
<VBox>
<Text text="Circulating Supply: {coin>/circulating_supply}"/>
<Text text="Total Supply: {coin>/total_supply}"/>
<Text text="Max Supply: {coin>/max_supply}"/>
</VBox>
</l:Grid>
<lab:LineChartJS
id="line_chart"
datasets="{projections>/datasets}"
labels="{projections>/labels}"
titleDisplay="true"
titleText="{coin>/name} predictions"
onLegendItemClick="onLegendItemClick"
onLegendItemHover="onLegendItemHover"
onClick="onClick"
onHover="onHover"
tooltipEnabled="true"
onAnimationProgress="onAnimationProgress"
onAnimationComplete="onAnimationComplete"
showLines="true"
spanGaps="true">
</lab:LineChartJS>
</content>
</Page>
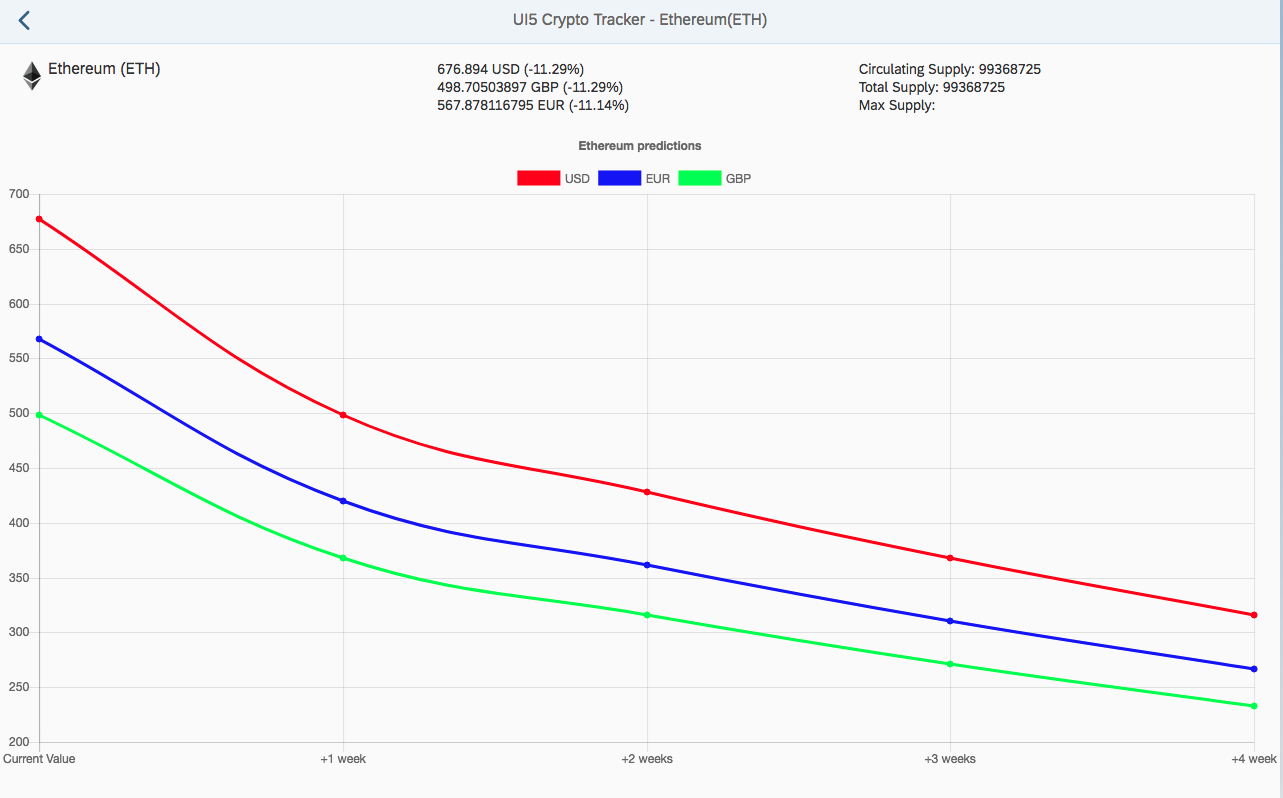
</mvc:View>Which actually looks like this in practice:

Our controller has actually got quite a few functions to support this screen so I'll talk through them all in smaller chunks down below:
        _onRouteMatched: function(oEvent) {
            let coinId = oEvent.getParameter("arguments").coinId;
            this.setDetailedCoinModel({id: coinId});
            const additionalCurrencies = ["GBP", "EUR"];
            let promiseArray = [];
            additionalCurrencies.forEach(key => {
                let promise = coinapi.getSingleCoinPrices(coinId, key)
                    .then(coin => this.addAdditionalCoinModelData(coin));
                promiseArray.push(promise);
            });
            Promise.all(promiseArray).then(data => {
                let coinData = this.getView().getModel("coin").getData();
                this.buildGraphDataModel(coinData);
            });
        },
Our updated onRouteMatched function is taking care of a few different things, now the Coinmarketcap API doesn't return to us multiple currency conversions at once so we had to make use of multiple API calls and a final promise.all call so that we knew that we had all of the final bits of data to generate our graph as shown below:
      buildGraphDataModel: function(coinModelData){
            const quotes = coinModelData.quotes;
            var data = {
                labels: ["Current Value", "+1 week", "+2 weeks", "+3 weeks", "+4 week"],
                datasets: []
            };
            Object.keys(quotes).forEach(key => {
                let newData = {
                    label: key,
                    fill: false,
                    borderColor: this.returnColourBasedOnKey(key),
                    backgroundColor: this.returnColourBasedOnKey(key),
                    data: [
                        quotes[key].price,
                        this.returnProjection(quotes[key], 0),
                        this.returnProjection(quotes[key], 1),
                        this.returnProjection(quotes[key], 2),
                        this.returnProjection(quotes[key], 3)
                    ]
                };
                data.datasets.push(newData);
            });
            var projectionModel = new JSONModel(data);
            this.getView().setModel(projectionModel, "projections");
        },
Our graph is entirely built up inside of this function, to understand why we have the data that we do I suggest taking a look at the chart.js documentation. We essentially loop through our quotes (USD, GBP & EUR in this case) and then create our datasets for our linegraph using some very basic math that simply takes the current weeks growth/ decline and then adds onto that week on week.
I won't go into ever single function, you can check out the project on github, simply clone it and run it from your local web server of choice.
Conclusion
Wow was this a big one, I've never actually written so much for a single post and I don't think I will again in the near future/ I will learn to split it up into a multi-part series rather than just start writing something at 6AM on a Monday morning.
I hope that this sort of post has been useful/ informative, I seemed to get a decent response from my last post on creating a UI5 news application so with this one I wanted to build on those sort of concepts but also take it further.
So by the end of this post you should have learned more about using external API's, how routing in UI5 works and how to include an external library in our UI5 project.
···
