DevOps for SAP UI5. How to automatically deploy your UI5 applications to SAP
Introduction
In this post I'm going to run through how to setup a very quick and easy DevOps pipeline using the NPM package nwabap-ui5uploader .
I chose this package for this post purely because it doesn't rely on us to use other tools in our pipeline already such as grunt/ gulp or the newer UI5 tooling. I often support legacy applications and so keeping my CI/ CD as streamlined as possible is a must for me.
I also have a blog on uploading SAP UI5 applications to the SAP Fiori Launchpad via SE38 if that's more your interest before diving into the world of automated deployments. Actually I would suggest it if deploying an application for the first time.
Pre-requisites
- Node.js / NPM
- ADT enabled and accessible
Download and install Node.js
If you haven't already installed node.js do so now from the node website which should come with NPM installed.
NPM install
We're going to install nwabap-ui5uploader to our project, which is as simple as the following command inside of your application directory:
npm install nwabap-ui5uploader --save-dev
alternatively you can install it globally with the following command:
npm install -g nwabap-ui5uploader
Let the package install and then let's get ready for our configuration
Ensure ADT is activated in your target SAP system
ADT (Abap Develeopment tools) was mentioned above as a pre-requisite, this requires you to activate the ADT ICF node in your SAP Front end server which is used for things such as ABAP development in VSCode or SAP Hana Studio.
Open SAP Logon and run the transaction SICF and activate the node, which should look like the below:
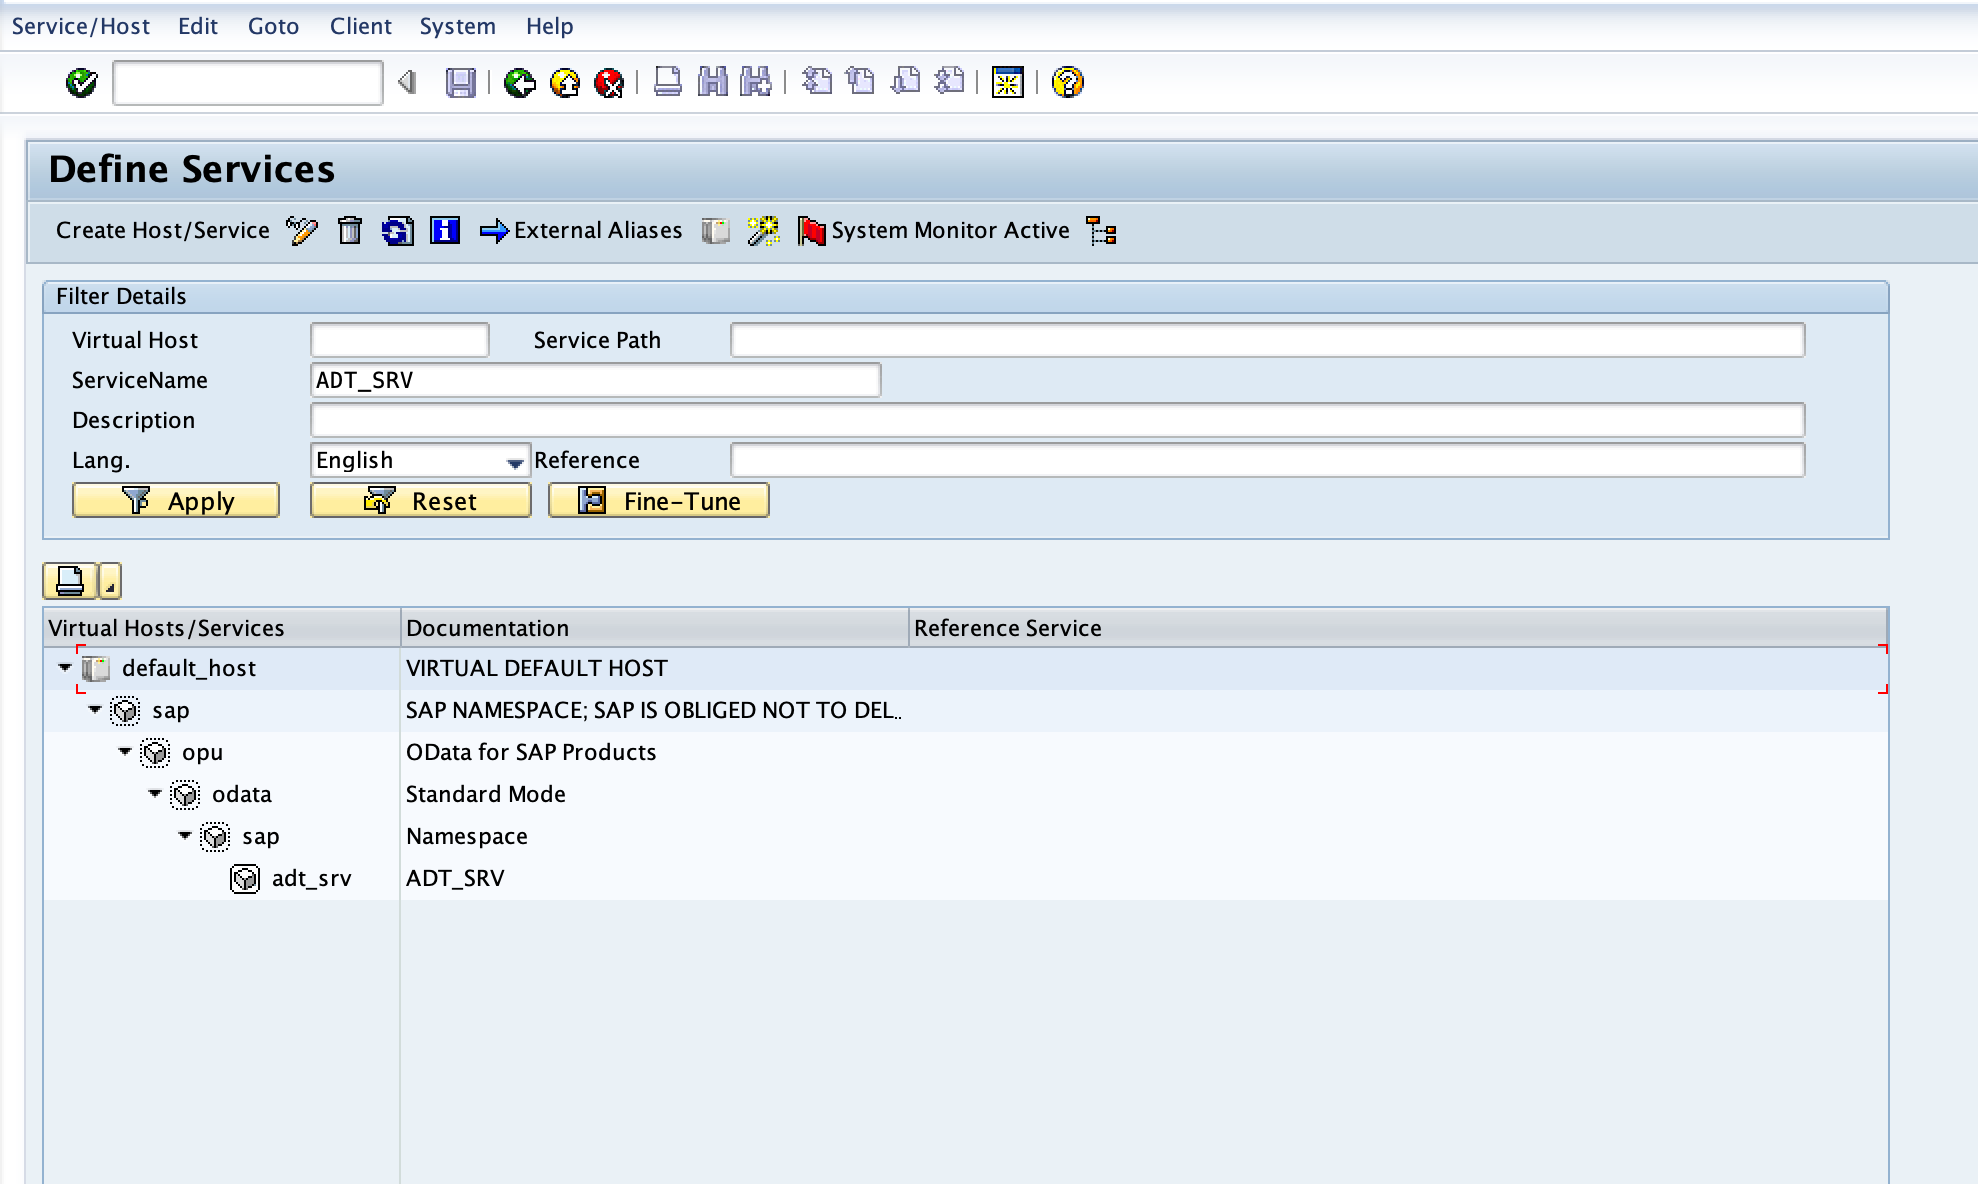
if it's greyed out you simply need to right-click and select 'Activate Service'.
configuration
We need to create a file called .nwabaprc in your package route which will have a configuration that looks like the following:
{
    "base": "./",
    "conn_usestrictssl" : false,
    "conn_server": "https://address:Port",
    "conn_user": "SAP USERNAME",
    "conn_password": "SAP PASSWORD",
    "abap_package": "ZPACKAGENAME",
    "abap_bsp": "UI5BSP",
    "abap_bsp_text": "BSP TEXT",
    "abap_transport" : "TRANSPORT NUMBER"
}
So what will the above do? Let's go through them line by line:
'base' references what folder to upload, seen as NPM runs from the base of my project it will just load up from './' which means the current directory. You might want to change this to "base": "./dist" to only upload your dist folder from your build scripts.
conn_usestrictssl : This is set to false because I'm accessing a server with a self-signed SSL certificate, quite common in the workplace and as such probably a neccessity for you too.
conn_server is the front-end servers address and port, you can get this information through a number of different ways but for me it's just typically been the same details of the Fiori Launchpad but your millage in terms of ports might vary.
conn_user is your SAP username.
conn_password is your SAP password.
abap_package is the package on which your BSP is assigned.
abap_bsp is the name of your BSP in which your UI5 application is assigned.
abap_bsp_text is the name of your BSP description in which your UI5 application is assigned.
abap_transport is the name of the transport number for which you've got open in your name.
Other options that exist which I've not included are as follows:
conn_client which is the client for which you want to connect to.
calcappindex which will automatically trigger the application re-index upon deployment, default false.
running the upload
Running the upload can be achieved by simply running a few commands:
npx nwabap upload
Or you can make a new script under your package.json such as the below:
  "scripts": {
    "deploy": "npx nwabap upload"
  },
which would then allow you to type npm run deploy which might be preferable for certain CI/ CD scenarios.
expected output
The expected output is that you'll get an 'ok' response for each file uploaded like the below:
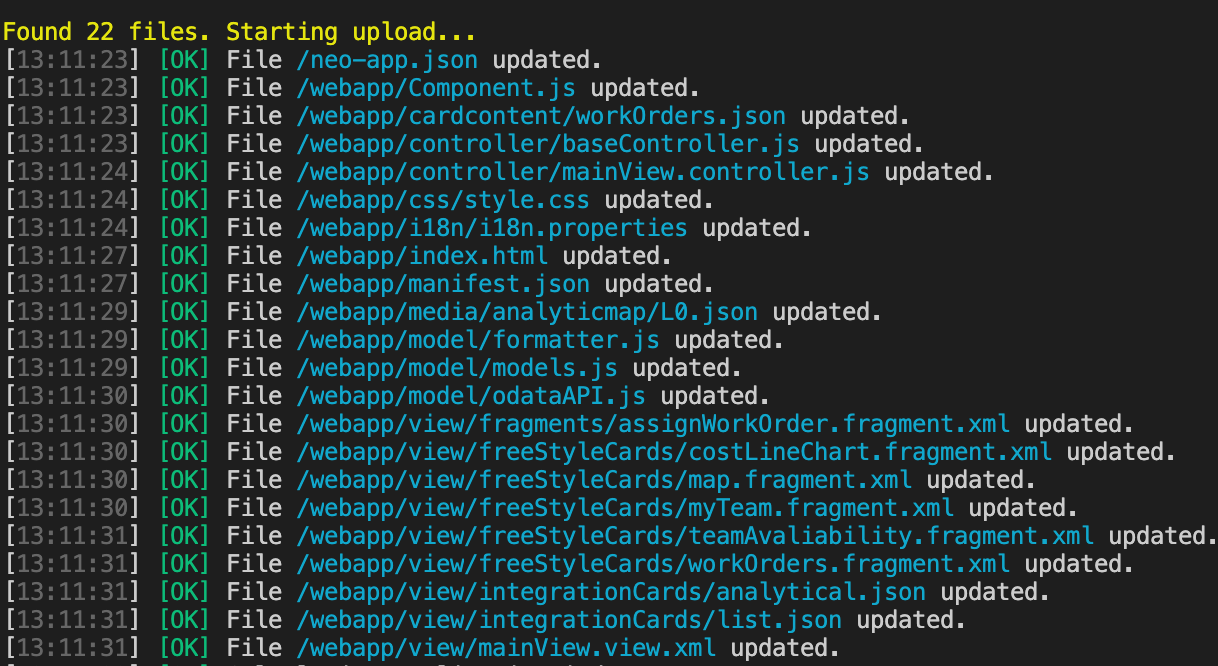
Which now means my application has been uploaded to my transport successfully! This means I can skip the SE38 upload entirely and go and test my application.
don't see your changes?
Okay, so in my system I didn't see my changes for some reason even after re-indexing the application. You might, but I had an additional step of clearing the ICM cache which you might know as the UI2 client cache.
To clear this cache you can simply goto SE38 and run the following program /UI2/INVALIDATE_CLIENT_CACHES and execute on either all users or just your own.
I'm working on automating this step as well but for now this might be the last manual process you need to run, or at least it was for me. Has anyone looked into automating this? I believe there could be some BASIS settings to automatically run on BSP file change but I'm not a Basis consultant so it's not ideal.
Conclusion
that's it! we've managed to automatically deploy to our SAP Front-end server using nothing but an NPM command. We've got a few variables to maintain in terms of transport request number but for now we can upload with ease from our terminal rather than going via SE38 or WebIDE.
Would you like to see more posts on DevOps setup? This is such a tiny step and I don't touch on setting it up elsewhere (I currently use this on my server to auto-deploy which allow my colleagues to auto-deploy without them running anything). Would that be something you'd be interested in? Let me know.
···
