Switching themes on the fly in our standalone SAP UI5 application
Introduction
In this post I'm going to talk about themes, more specifically how we can switch themes in our live application as well as keep those settings in-between different sessions and even applications so long as they're deployed on the same domain. I would note that this is intended to be ran "standalone" UI5 application so not deployed to any Fiori launchpad as the FLP has this sort of functionality built in already so would be redundant.
Why are we doing this?
The why is simple, outside of an FLP we don't have access to the theme settings, so we're going to make our own and try and make it as "drag and drop" as possible so we can include it in multiple applications.
The primary reason that we're implementing this functionality however is because of accessibility as we'll be implementing the high contrast themes within our menu to switch.
What about via url parameters?
That should work too! You should in all instances just be able to add index.html?sap-ui-theme=sap_hcb for example to the end of your URL to load the theme sap_hcb which would be the same as our 'high constrast black' option. This will just work without you doing anything but honestly I think the solution I outline below is more robust, works across multiple applications (on the same domain, if they all have some of the same files/ implementation) and doesn't rely on someone knowing how to launch an application with the names of the themes.
However this might be enough for your requirement, so if you want a really quick way to show someone your application in "high contrast black" just add the query parameter ?sap-ui-theme=sap_hcb to the end of your SAP UI5 application url.
Getting started
The same as almost all of my blogs, I get started with a completely blank SAPUI5 project so nothing extra and nothing fancy. So if you're using WebIDE or Business Application Studio just use a standard Fiori template and I will be using a template from my own npm package ExpressUI5.
Create our menu fragment
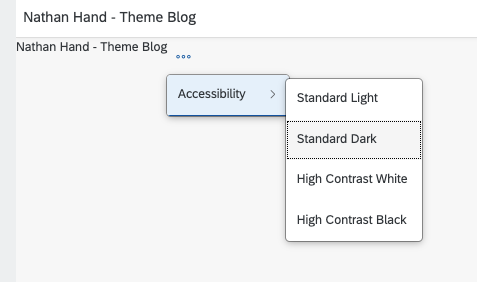
First of all there are 4 different themes we want to switch between, these 4 themes are going to be sap_fiori_3 (current default), sap_fiori_3_dark, sap_hcw & sap_hcb and so we're going to build this around that.
We're putting this in a menu fragment simply because that's how my original design was implemented, this could be adapted to any number of view controls but I'm just going to focus on a menu fragment setup.
<core:FragmentDefinition
    xmlns="sap.m"
    xmlns:core="sap.ui.core">
            <Menu itemSelected="onSelectTheme" >
                <MenuItem text="Accessibility">
                    <items>
                        <MenuItem key="sap_fiori_3" text="Standard Light" />
                        <MenuItem key="sap_fiori_3_dark" text="Standard Dark" />
                        <MenuItem key="sap_hcw" text="High Contrast White" />
                        <MenuItem key="sap_hcb" text="High Contrast Black" />
                    </items>
                </MenuItem>
            </Menu>
</core:FragmentDefinition>
Taking the above you can save it as a fragment within your view folder, I have decided to name mine "overflowMenu.fragment.xml".
Create our helper file and functions
Keeping in the mind of having this be as modular as possible I'm going to create a separate file to store our methods for getting and setting our local storage where we're going to keep our theme information. If you've never used local storage before and don't understand it's use then please see my blog on How to move data between views in UI5 and search for the "Local storage" header.
Within our "webapp" folder I have created a folder called util and then inside of that folder I have created a file called themeHelper.js where we can store our functions.
sap.ui.define([], function () {
    "use strict";
    return {
        getTheme: function () {
            return localStorage.getItem("theme");
        },

        setTheme: function (sTheme) {
            if (sTheme) {
                sap.ui.getCore().applyTheme(sTheme);
                localStorage.setItem("theme", sTheme)
            }
        },

        initTheme: function () {
            const sTheme = this.getTheme();
            if (sTheme) {
                this.setTheme(sTheme)
            }
        }
    };
});
Understading our functions
getTheme
The getTheme function is really simple, we simply return our localstorage enter under the key of "theme".
setTheme
The setTheme function is again rather simple, we will take the argument of "sTheme" (which we anticipate to be one of the 4 themes mentioned above) and then apply that theme to our local storage as well as apply the theme to our current ui5 application.
initTheme
The initTheme function is a combination of the above two functions, we simply get the theme name and then set it if it exists, if our local storage isn't populated our getTheme function will return undefined.
Load our menu fragment for our view
Adding a button to our view
In our view we're just going to have a button to open up our menu, again this could be done any number of ways but this is the way I've chosen for this tutorial.
<Button icon="sap-icon://overflow" press="onPressOpenOverflowMenu" type="Transparent" />
Adding the press event function to our controller
In our controller we need to call our fragment and open it up next to our button. If you've not worked with fragments before I would suggest my blog How to bind data to xml fragments in UI5 in which I explain loading fragments.
onPressOpenOverflowMenu: function (oEvent) {
    const oButton = oEvent.getSource();
    if (!this._oOverflowMenuFragment) {
        this._oOverflowMenuFragment = Fragment.load({
        name: "com.nathan.hand.themeblog.view.overflowMenu",
        controller: this
        }).then(function (oMenu) {
            oMenu.openBy(oButton);
            this._oOverflowMenuFragment = oMenu;
            return this._oOverflowMenuFragment;
        }.bind(this));
        } else {
            this._oOverflowMenuFragment.openBy(oButton);
        }
}
NOTE: Change the "name" for the fragment to match your application namespace
Adding in our "onSelectTheme" function
In our controller we'll need to implement our "onSelectTheme" functin as defined in our overflowMenu fragment, but before we do that we need to import our themeHelper to our controller.
Importing themeHelper
At the top of our controller add in the path to your themeHelper file as an import, mine looks something like this:
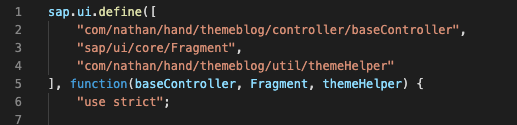
NOTE: Change the "com/nathan/hand/themeblog" with your own application namespace
define our onSelectTheme function
onSelectTheme: function (oEvent) {
    const oItem = oEvent.getParameter("item")
    const sKey = oItem.getKey();
    themeHelper.setTheme(sKey);
},
understanding 'onSelectTheme'
This function simply returns the key of the selected menu item and then sends the info to our themeHelper.
demo time
Test run time! Let's run our application and see what happens, we should just have a simple menu that we can interact with, I also added in a small text line just to give some context as to what changes automatically.

The above is the "standard light" theme
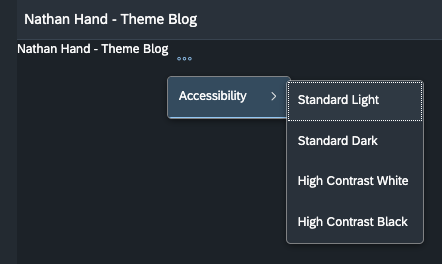
The above is the "standard dark" theme.
A gif example
How do I have this apply automatically on launch of my application?
So as I mentioned above one of the reasons that we're doing this is to ensure our users set this setting once to their preferred theme and then forget it/ never have to change it again. Currently our application doesn't automatically apply this, I think the best place to do any sort of automatic applying of the theme is inside of the component.js file.
We need to import the themeHelper as discussed above but instead to our component.js file, so you should make sure you've done that.
Next inside of the init function add in the following line themeHelper.initTheme(); which will call the function we mentioned above from our themeHelper.js file.
Refresh and you should have kept your theme!
Conclusion
That's it! We've managed to introduce a relatively quick and easy way to switch and more importantly keep themes across our browser sessions and depending on your setup of applications should even be kept across multiple apps.
This blog was just put together after a requirement came up at work, I thought it was quite a nice way to switch themes and start to bring our accessibility capabilities in-line with what you would see from a typical Fiori launchpad deployment.
···
